In 1977 an action movie was released called “Smokey and the Bandit.” The film centered around the antics of a Pontiac Trans Am driver, Bandit, running interference for a semi-truck load of bootlegged Coors beer. In hot pursuit was a Texas cop dubbed Smokey. The movie starred Burt Reynolds, Sally Field, Jackie Gleason, and Jerry Jones. It was the second highest grossing film of 1977, finishing second only to the first edition of “Star Wars.”
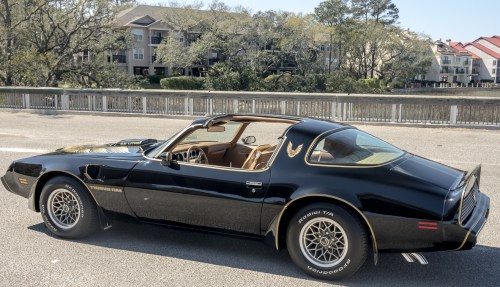
JJ Bandit’s car was a black 1977 Trans Am Special Edition. The SE T/As were resplendent with a large gold “screaming eagle” on the hood, abundant gold pinstriping, and special badging.
Special Edition Trans Ams were produced in 1978 and 1979. They were all black in color and included the graphics that appeared on the movie car. The movie’s affect on Trans Am sales could not be understated, as a record number of 1979 Firebirds (over 200,000) were produced. In fact, for the only time, Firebird sales exceeded Camaro. About 11,000, 1979 Trans Ams were Special Edition (Y84) models.
I have always been a fan of GM’s F Bodies, the Camaro and Firebird, and have owned a number of them over the years. I have also been especially interested in limited production or special edition vehicles. A couple of examples in the garage include the ‘69 Pace Car and the ‘70 Judge. With that in mind, I set out to find a 1979, Y84, Special Edition, “Smokey and the Bandit” Trans Am. As with the other cars, originality and verification paperwork were of prime importance.
The search began in the usual places; Hemmings, eBay, Craig’s List, Autabuy, Autotrader Classics, and other car sites. A few months of searching and numerous phone calls and emails brought me to a 1979 Trans Am Y84 in South Bend, Indiana.
The car was originally sold in South Bend and went into a barn two years later after the original owner died. It stayed in the barn for thirty years before being purchased in 2011 by a father as a gift to his son. The son drove the car very little over the intervening years, and, with the demands of a young family, decided to sell it. He was a very nice young man, and we spent a lot of time face-timing, discussing, researching, and ultimately negotiating the purchase price of the vehicle. Finally, the day after my 70th Birthday, a good friend and I went to South Bend to bring it home.

The car was rock solid with a little under 29,000 actual miles on the odometer. A test drive showed that the car ran and shifted great. The numbers matching T/A was equipped with the original Olds 403 engine and Turbo 350 transmission. In 1979, all automatic Trans Ams had the Olds motor, while the much rarer four speed cars came with the Pontiac 400. The car also had the optional WS6 package which included suspension upgrades, four wheel disc brakes, and eight inch wide aluminum snowflake wheels. In addition, the T/A was equipped with functioning air conditioning and t-tops. The car had complete PHS documentation and the original build sheet.
After getting the car home, an examination showed need for a new headliner, front seat covers, carpeting, general interior refresh, miscellaneous engine compartment parts and thorough engine cleaning and painting. The car was built in Van Nuys, California and painted with water based paint. The paint was faded and the decals were also faded and cracked. The Trans Am would need new paint and decals.
Before heading to the body shop, I took the car to my mechanic for a thorough going over. The car was pronounced sound, and we flushed the cooling system and changed all the belts. The car was safe and should prove reliable.

The Trans Am then went into my friend Gary’s body shop. Gary had done a number of cars for me over the years, and always did a good job at a fair price. He was a source of solid advise and had become a good friend. While in the body shop, small dings were filled, the old tired decals were removed, and the car was prepped for primer and paint. After applying the starlight black base coat and multiple clear coats, the car was block sanded and buffed. While the car was in the body shop, my wife and I installed a new headliner and repainted numerous small parts. We removed the door panels and thoroughly cleaned the carpeted lower portion. The front seats also received new padding and seat covers. The car was ready to be shipped to Hilton Head Island, South Carolina for a winter of further restoration.
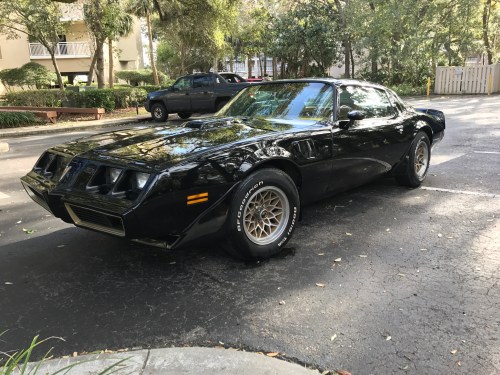
Once in Hilton Head, we began by removing each wheel, sanding them, and then priming and painting each one the correct placer gold. To mask the unpainted outside surfaces of the honeycomb patern, I used lip balm, and then used a razor blade to remove the unwanted primer and gold paint. It worked great.
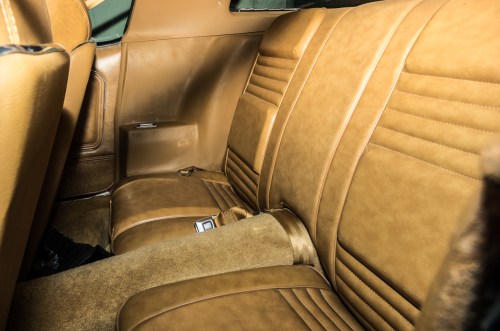
Next came work on the factory original camel tan interior. Once in Hilton Head, the front and back seats were removed along with the console, rear side panels, sill plates and the old carpeting. The exposed floor pans looked as if they had just left the factory. The car was very solid.
New molded carpeting was installed, and it fit perfectly. While the interior was apart, I installed a new package tray and freshened some of the sun faded camel tan interior surfaces. The dash pad, gauge face plate, and steering wheel were in very good shape and needed no attention. The finished interior looked super.

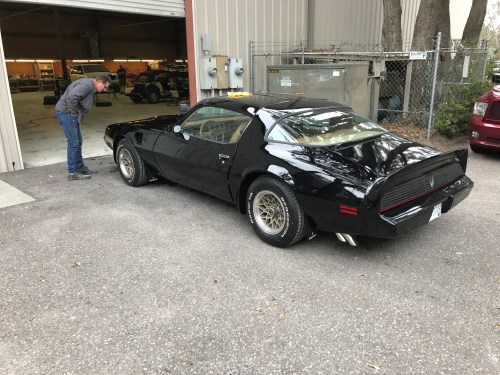
Before applying the new decals, I took the car to a local body shop for some additional sanding and buffing to bring the car to a level beyond the norm. Gene, the fellow at the body shop came highly recommended. Gene took pride in the car, and did a phenomenal job in bringing out the depth of the black paint. One of the positive aspects of the old car hobby is the people you meet. Gene and Gary are perfect examples. They are not only very good at their trade, but also honest and fair people to do business with. I really enjoyed working with Gene on refining what was already a great exterior finish.
The decals came on two large sheets; one included the hood bird and the other all the pinstriping. Installing the large one-piece hood bird had been a source of worry for some time. Watching how-to videos did nothing to alleviate my fears.
The day of reckoning arrived, and extra help graciously showed up to give us a hand. After carefully marking the decal location on the hood, we peeled the backing off, applied gel to the hood and decal, and positioned it in place. After an hour-and-a-half of squeegeeing the bubbles out, I set the car out in the sunshine. Time in the sun and additional work with the squeegee took care of the remaining small bubbles. With a sigh of relief, the job was done!

The sheet of stripe decals covered an entire double bed. Each decal was identified as to its location on the car. A week of painstaking placement made the car true to its “Smokey and the Bandit” heritage.
It was time to clean and detail the engine compartment. After degreasing the engine at a local car wash, inspection showed most components to be in generally good shape. The hood hinges were sanded and painted factory color as were the brake vacuum boost and master cylinder. The alternator was removed and correctly detailed as were the air conditioning brackets and hose connections. The heads, block, and valve covers were detailed with correct Olds blue. The battery tray was removed and painted, and the windshield washer and coolant overflow tanks were replaced. The shaker components were painted, and the underside of the hood was painted under-hood black. Other general cleaning and touch up left the engine compartment looking very nice.

Before shipping the car home, there was a gauge issue that needed attention. From the time I took the car for its test drive, I knew the temperature and oil pressure gauges were not working. Upon recommendation, I took the car to a local mechanic. The problem was diagnosed as a faulty circuit board. The board was replaced, the gauges calibrated, and the problem was solved.
It was now time to ship the car home for display at the summer car shows. The Judge and Trans Am should provide a formidable Pontiac duo.
Enjoy the gallery of photos of the finished Trans Am taken in Hilton Head just before heading back home.